Showing posts with label wedding reception. Show all posts

Monday, May 17, 2010

I hope our guests are wearing stretchy pants...

Well, its official. Our wedding is going to be an eating extravaganza. Yep. An all night marathon of food. I hope our guests are preparing for this in advance...

Mom and I had a final (hopefully) meeting with Carlouel last week. I swear, each time we leave from one of our venue meetings, my mom and I couldn't be in a better mood. Everything about our experience with Carlouel has been a dream. And the menu is no exception.


Remember our first tasting? Well, guess what...we...nixed...everything...
After ruminating about our first tasting's selections, my mom and dad brainstormed with me on what we would love to have at the reception. We were searching for variety, fresh foods, and a lot of different flavor profiles. After collaborating with Chuck, we were able to come up with what I consider to be a pretty amazing menu.

Get ready to start drooling...now...

Appetizers: Our guests will step outside for our cocktail hour immediately following the ceremony. They will be able to enjoy the following:

  • Crudite table set up with crackers, cheese, fruit, smoked fish spread, and artichoke dip
  • Lobster stuffed baby portabella mushrooms
  • Parmesan cups filled with grilled mixed vegetables
  • Caprese salad kabobs: 6" skewers with buffalo mozzarella, cherry tomatoes, and basil marinated in balsamic
  • Open faced grouper sandwiches
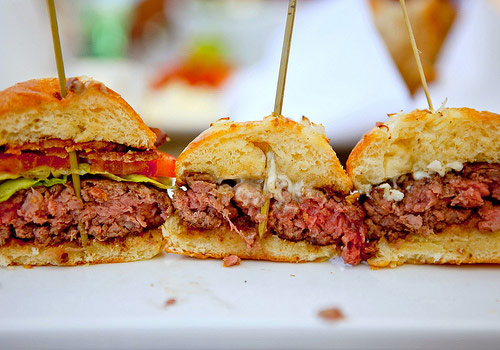
  • Poolside grill will be cooking kobe beef sliders to order

After the cocktail hour, guests will move inside to their reception table. Salad will be served at their seat.

Salad: spring mix with carmelized pecans, gorgonzola, and craisins. The salad will be dressed with my mom's recipe for honey lime vinegarette

We will then open up the five tasting stations for dinner. Each station will serve a small plate of food (salad plate size), and guests will be able to take one plate, sit at their table, and come back for multiple tastings. The stations are as follows:

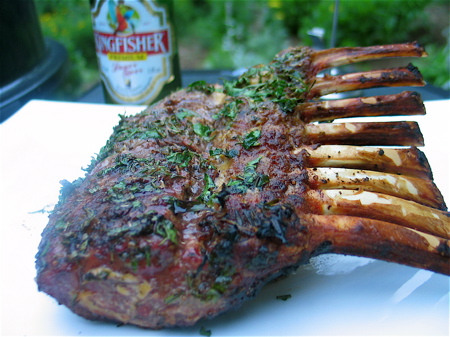
  • Baby grilled rack of lamb with a light herb seasoning, served with tzatziki sauce, rosemary roasted red skin potatoes, and asparagus


source

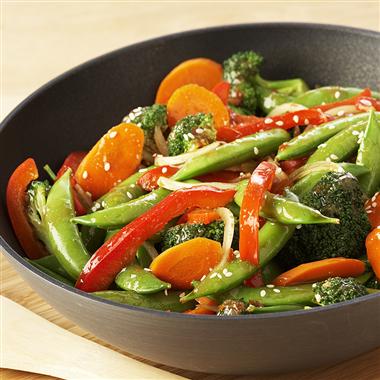
  • Stir fry: choice of chicken, pork, or shrimp. Served with stir fry vegetables, sticky rice, and chopsticks

source

  • Chilean sea bass, served with julienne vegetables. Guests will have a choice of chimmichurri sauce or mango salsa
  • 5oz petite filet mignon, served with a spinach souffle and au gratin potatoes
  • Mixed veggies (black beans, corn, tomatoes, green pepper) and chicken, served in a homemade taco shell bowl, topped with cilantro, guacamole, cheese, and salsa

source


About 45 minutes after dinner is complete, we will cut the cake. It will be served on a table with a coffee service and the following desserts:

  • Mixed berry tarts

source

  • Mini key lime pies


source

  • Assorted cookies: chocolate chip, oatmeal raisin, and white chocolate macadamia nut

source


At this point, guests might think that the night is over and they can be wheeled out to their cars; most likely with their pant buttons unbuttoned to accomodate all of the food they just ate. But wait...there is one more detail to our menu for the evening...

A french fry bar!
I really liked the idea of having a "late night eating encounter," and so we added one on! We will be serving:

  • Fresh made french fries in paper boats
  • Condiments: ketchup, malt vinegar, season salt, nacho/melted cheese, bacon bits, green onions, jalapenos, and sour cream

source


source


  • Chocolate milkshake shooters!!!


When Chuck suggested the french fry bar, I think my brain went into wedding bliss overload. Whenever I have a night of drinking, I usually start craving greasy food: pizza, french fries...perhaps a pot of Kraft mac n cheese. To me, this will be the perfect ending to our evening; I hope our guests will enjoy the surprise!

So...are you full just thinking about the amount of food that will be served at the Buttons' wedding??? I sure am!


What is your favorite item on your wedding menu? Are you adding any late night treats for your guests?

Monday, December 21, 2009

Light it Up!


If you’re not already following along with the creation of my centerpieces…first I accumulated my vases, then I went through a trial run with the baby’s breath.

Next, I assembled a few samples!

In addition to my vase-purchasing frenzy, I also cleared TJ Maxx and Marshalls on any and all of these adorable little bird figurines. I now have a rather sizeable flock!

I wanted to create the ambiance/arrangement that we will have the evening of the wedding. Ideally, the lighting will be low and the reception tables will be illuminated with votives. Perhaps like this?

Aren’t the little birds adorable?

I plan to use one tall vase and one short vase in the arrangement. I’ll add a bird on one side, and the table number/letter on the other. Votives will be scattered around the table.


So…what do you think? Did you have an easy time turning your visions into reality for your reception tables?

Saturday, December 19, 2009

Setting up the Gift Table

I want to make sure that we continue the whimsy of our décor on to the gift table! I collected a few odds and ends, and I plan on arranging them in some way.

Here are a few of my trials thus far:


I ended up returning this particular birdcage (to be used for cards); I am going to continue looking for something a bit larger/more detailed. I also need to find some more vintage/old books. Any suggestions on where to find some?

Did you do something special/do you have something planned for your gift table?


I have a giveaway for 100 custom post cards...don't forget to enter!

Wednesday, December 16, 2009

DIY pinwheels…

Yesterday, I showed you my pinwheel inspiration, and my first attempts at the project. Today, the tutorial!

First, I searched high and low for the paper I wanted to use. Ideally, I would use scrapbook paper because of its thickness/sturdiness. However, with 300+ pinwheels to make, purchasing scrapbook paper at 60 cents a sheet (or buying one sheet a week with a 40% off Michael’s coupon), would be costly AND time consuming. I searched high and low for paper, and then found the perfect solution in the least likely of places…THE DOLLAR STORE!

Yes, no lie! I was walking through the Dollar Tree to find something, and I walked by their gift wrap section. They had bins filled with wedding-related gift paper, and I started digging though the containers like a scavenger. What I came out with was…this!

It is ivory paper with a platinum/silver floral print. I purchased the roll and brought it home. When I set it next to our centerpiece vases, I was pleasantly surprised! It coordinates amazingly!

So, lets get started!


1.) I used a yard stick to measure out a 3 inch wide strip of paper.


2.) Next, I cut the strip to measure 12”x3,” which left a 6”x3” extra piece…which I cut down further to make two 6”x1” strips for a small pinwheel!


3.) For the larger pinwheel, I made ½” accordion pleats*. I am left with two accordion strips.


4.) At the end of one strip, I squeezed a small line of 3-in-1 Advanced Craft Glue (the fast drying stuff…although you could use tacky glue if you want…I like instant gratification though!), and then connected the two strips into one long one.


5.) Leave the strip to dry for a minute, and then connect the two exposed ends together. You will be left with a crinkly circle…it kind of reminds you of one of the coffee cup sleeves you get at Starbucks!


6.) When that dries, it is time to flip the paper into a pinwheel! I place my thumbs on the top of one end, and my other fingers on the other side, then twist my wrists so my thumbs come together. This part, at first, made me really nervous, but once you have the paper flipped, you are able to fix the edges/refold any pleats that you might have stretched out.


7.) Add a generous dot of glue to the center of the pinwheel to hold it together. Let dry.


8.) Finally, place a dot of glue on the back of a button, and set it in the center of the pinwheel. And…voila!


Now…I’m going to repeat this x300…but with a smile on my little face, because this is one of the most cost effective projects I'm diving into! The paper is 15 square feet, and according to my calculation, I will need 5 rolls, so I bought 6 to be safe...which came out to a grand total of $6.42 for all of the paper! My grandmother has TONS of buttons at her house, and she is sending me a box of them for the centers, so that aspect of my pinwheels is free! I purchased the glue at Michael's with a 40% off coupon for less than $3. I might need to purchase an additional bottle as I get farther into the project...but I'm not too worried about it at this point!


How are your DIY projects coming along?

*For my smaller pinwheels, I used ¼” accordion pleats. You might need to try out a few different widths before you find what you like!

Tuesday, December 15, 2009

Yes, I am certifiably insane…

A few weeks ago, I was browsing through the sea of wedding blogs on my reader, when I came across a rather inspirational series of photos on Style Me Pretty.

This table arrangement made me swoon…but of particular interest were the pretty paper pinwheels! How cute are these???


All images from Style Me Pretty.

I quickly wiped the drool off of my face, and began to think. This…is…do-able! I love the combination of whimsy and elegance the pinwheels create! After figuring out the logistics of creating them (sooo easy…a tutorial is forthcoming…I promise!), I decided to try out a few samples. It took a few to get the hang of it…haha!

I used scrapbook paper (12”x12”), which I cut into 3” wide strips, and put in 1” accordion folds. 1” was CLEARLY too big…

After the first failed pinwheel, I decreased the accordion fold to ½” wide, and the result was much better! To finish the look, I added a button to the center…so cute!

After I made the larger pinwheel, I tried out a few smaller sizes as well, decreasing the pleats to ¼.” I thought they turned out well!

So…what am I going to do with these, you ask? First, the large pinwheels are going to be tied to the back of ½ of our reception chairs (every other one) in a similar fashion to what was pictured above. The medium sized pinwheels will become a part of the place settings. And, finally, the tiny ones will be used on our escort cards! According to my calculations, that means I have to make at least 300 pinwheels...gulp! I’m so excited about the final outcome…but am somewhat dreading the pain that my fingers are going to undergo during the folding process!

Next up, I’ll show you the pretty paper that I found, search for hundreds of buttons, and provide you a tutorial on how to make your own pinwheels!

Thursday, December 10, 2009

Vintage-y Vases

So, if you recall, I somewhat recently decided to make a switcheroo in regards to my reception flowers. Bye bye hydrangeas, hello baby’s breath!

Next up on the to-do list was to figure out what to display the beautiful poufs of baby’s breath in!

My mom and I began by scouring JoAnn Fabrics, Michaels, and the like. We saw a lot of the same thing; clear glass vases in different shapes/heights. It could work, but I wasn’t in love.

Then, we decided to try our luck elsewhere by visiting our all-time favorite stores; TJ Maxx and Marshalls. My mom mentioned that she had seen some pretty vintage-looking vases there previously. We walked down the aisles in anticipation…

And…boy was I glad we went there! Vases in various shapes, sizes, and patterns galore! And they were a very reasonable price, ranging from $3.99 for the smaller pieces to $7.99 for the larger ones! We quickly gathered every single vase we could see into the shopping cart…and then proceeded to visit every TJ Maxx and Marshalls in the Tampa/Clearwater area to clean them out!


Here is our stash…I am just loving them!

I plan to combine at least one taller vase with a shorter one, and add some “extra” items on the table (such as bird figurines, vintage books, and tea cups)…I’ll show you some of my first trials shortly! And my favorite aspect of these vases is that we will DEFINITELY re-use them after the wedding! My mom is fond of them, and they match the décor in the house…and I know that I will want to keep a handful for Justin and I to decorate our new home! Sure, there will most likely be some leftovers, but I am loving the fact that I don’t have to rent them for $15 a vase (since that is what we were previously quoted by a florist for similar containers…yikes!)!


Are you planning on DIY’ing your centerpieces? What did you do/are you planning to do with the containers after the day is done?

Tuesday, November 24, 2009

Revisiting the venue

So, as you may have heard, I have a jam-packed week! And, thus far it has proved to be extremely productive…I couldn’t be happier!

On Saturday, there was a wedding at our venue. I was so excited that we were lucky enough to be home during a week with a wedding occurring! The manager told us that we could swing by during the early afternoon, before the guests started to arrive. I couldn’t wait to get there!

When we originally visited the venue, it was set up for normal day-to-day club activity. This time, it was in “wedding” mode. I was so glad to see the differences! Now, I’ll share some before-and-after pictures!

Remember the front entryway?

BEFORE:

Last time, it was filled with couches and a coffee table. For a wedding, they remove these and place a skirted table in the center of the room under the light fixture.

AFTER:


…and that…my friends…is where the wish tree guestbook is going to be placed!


Can’t you just imagine it? The tree will be the first thing that our guests will see as they walk through the venue’s door…

Also, behind and to the side are the skirted tables for the gifts, etc. I found some great items to decorate that space with…but I’m going to keep you in suspense until later…


There is a NEW addition to our venue since we last visited! Apparently, there was a wedding at Carlouel in October that used grapevines wrapped with white lights and votive lamps. The manager liked it so much, that he bought it from the florist, and it has remained up ever since! Unless a bride requests it to be taken down between now and the end of May, we are going to keep it in place! And, the manager was nice enough to tell us that they would put it back up for us if we wanted it and it had been taken down! Yay for free décor items!!! And, ooooh I’m drooling at the thought of how it will be lit up during the reception…so romantic!


Just to give you an idea of how it looks lit up!!! So...romantic...


Last time we were at Carlouel, the “birdcage” area (I’m not kidding, they call it that…how perfect?) was set up for regular lunch-time pool activity.

BEFORE:


This time, we got to view the bar/cocktail hour setup! They set up a really nice large bar out by the pool, remove the tables and place them outside the covered area (and cover the tables with linens), and add a few tall pub tables. I’m digging the setup for our cocktail hour (now if only the weather would be perfect….)!

AFTER:

So, I am SO BEYOND excited about our venue after out visit! It really solidified how incredibly awesome of a choice we made. Sigh of relief, anyone???

With subsequent trips, did you just continue to fall more and more in love with your venue???