Showing posts with label wedding decor. Show all posts

Monday, June 28, 2010

Last minute projects...I like to procrastinate!


The week before the wedding was an absolute blur, and I mean it! The amount of appointments and tasks on my to do list was staggering, but somehow the clan was able to pull it together in the end!

I wanted to share a few of my last minute projects that were pulled together before the wedding! Lets begin with...OOT bags! Our guests were staying at a suite style hotel, so each of their rooms was equipped with a full kitchen! This definitely allowed for us to provide some yummy snacks for them!

I'll be honest; I didn't take photos of the contents of the bags, but here is what each of them included:
  • 2 water bottles with monogrammed sticker label (this one):
  • 2 instant lemonade mixes
  • bag of microwave popcorn
  • 2 chewy granola bars
  • 2 bags of Miss Vickie's chips
  • 1 bag mixed nuts/trail mix
  • 2 packs of crackers: cheese and peanut butter
  • Welcome packet/information

All of the goodies were placed in a pretty gift bag that I adorned with pinwheels. Pinwheels? Oh yes...remember those pinwheels I told you about a few months ago? Well, that particular project was abandoned part way through, and I was left with a big stack of pinwheels that I wasn't going to use. Hello, OOT bag decorations! I used my hot glue gun to attach a few pinwheels on each OOT bag, and voila! Fancy pants bags!

***Sigh...*** Don't they look fabulous??? I know, I'm totally biased...


The next project on the agenda? Table letters! Yes...I said letters. I decided that I wanted to use letters instead of table numbers simply for financial reasons...less materials to purchase in the end! I am in love with how they turned out! Let's take a little peek at them...

I purchased all of my materials at Michaels, and the process of putting them together was so easy! I purchased the required number of wooden letters, the corresponding number of flat circular discs (located right next to the wooden letters in the store), a bottle of cream acrylic paint, another in brown, and 2 bags of reindeer moss. I painted each of the disc stands brown, and each letter in cream. Using my hot glue gun, I attached each letter to a stand, and then glued bunches of reindeer moss to the stands. Easy peasy...and I think they look fabulous!

And finally, the escort card display! I found some awesome antique-inspired trays/boxes one day, and I knew that they would be perfect to display our escort cards on! We realized that they were a bit too deep to just set the cards into, so we had to come up with a pretty solution! We used some leftover cardboard boxes laying around the house and created a "platform" of sorts in each tray. From there, we fastened some sheet moss to the cardboard so it was no longer visible. It created a pretty platform in which to display the escort cards I printed!

Of course, that really wasn't the end of the projects...but it is the end of the projects that I have photographic evidence of! Justin and his dad created a wonderful faux-to booth for our guests to enjoy, and Justin and I had some fun with spray paint to create our card box!

Don't worry - the garage door is open so we wouldn't asphyxiate ourselves! And finally, we committed my grandmothers, grandfather, and aunt to slave labor in order to create our favors...

Hopefully I'll have some photos to share with you of both of these items when my pro photos come back!


Do you ever leave projects to the last minute? Did you have any wedding-related projects that didn't come together until the final deadline?

Wednesday, March 24, 2010

A magnificent mantle

So...remember my venue? If you recall, Mr. Buttons and I will be holding our wedding ceremony in front of Carlouel's huge stone fireplace...

(personal photo)


It is gorgeous on its own, clearly...but something was missing. Mommy Buttons and I were a bit perplexed as to why their fireplaces don't have mantles (there is a matching fireplace opposite the one we will be standing in front of for the ceremony)! I mean, that is pretty standard, right? And...there are such beautiful possibilities for decor with one!


Source


Source


Source


Source


At first, Mommy Buttons and I passed the idea of building our own mantle back and forth. Then, when we had a meeting with the club manager, my mom mentioned that we were thinking about constructing one, and asked if that would be ok with him. The response we received was unbelievable.


They...are...constructing...one...for...us!


Actually, they are constructing two mantles; one for each of the fireplaces. They will be removable, so the club manager will be able to use them in the future for different events - how cool! But, since they are being created for our wedding, he is building them based on our specifications/requests.


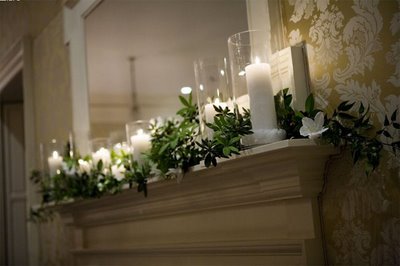
I wanted to jump up and down and do a happy dance when I learned the good news...and then began pondering how we will decorate our creation! At the moment, we are planning on filling it with large white pillar candles, as well as a lush display of flowers that match the bridal party bouquets! I can hardly wait to see how it all comes together!


Did you construct/have anything constructed for your wedding? What was it?

Saturday, December 19, 2009

Setting up the Gift Table

I want to make sure that we continue the whimsy of our décor on to the gift table! I collected a few odds and ends, and I plan on arranging them in some way.

Here are a few of my trials thus far:


I ended up returning this particular birdcage (to be used for cards); I am going to continue looking for something a bit larger/more detailed. I also need to find some more vintage/old books. Any suggestions on where to find some?

Did you do something special/do you have something planned for your gift table?


I have a giveaway for 100 custom post cards...don't forget to enter!

Friday, December 18, 2009

Creating the Centerpieces

So, if you’ve been following along, you know that I decided on using baby’s breath for my DIY centerpieces, and that I scoured the stores to find a plethora of vintage-y vases.

Now, it is time to take them on a test run (please try to ignore my end-of-day nasty hair-do if you can)!


I purchased 3 small bunches of baby’s breath from Publix (they sell 3 bunches for $10). Each bunch included 3 stems. First, I cut the stems down (each stem has a number of smaller “branches” splitting off on each side), and then simply placed them in a vase until I achieved something that looked like this:


So simple, yet so pretty! Each vase requires an average of about 3 stems of baby’s breath. I was pleasantly surprised to see how full the vases looked with what seemed like 3 measly stems when I started!

But, we decided that we needed to make the process even easier, since we will have to assemble them ourselves on the day of the wedding. We tried out the method of securing the stems with a twist tie. Easy! We arranged the stems into a “pouf,” wrapped them with a twist tie, and then dropped them into the vase. This will work out well we hope! The plan is to assemble the poufs the night before/the morning of the wedding. We are starting to collect wine cases; each pouf (and its matching vase) will be placed in a slot for easy travel.

Source

Then, we will simply have to place each pouf into its vase when we arrive at the venue. Hopefully, this will save us time, as we won’t have to hang around the venue to assemble flowers the entire morning!

Did you take on a DIY with flowers? How did you go about transporting/arranging them on the day of the wedding?


Don't forget to enter to win 100 custom postcards!

Tuesday, December 15, 2009

Yes, I am certifiably insane…

A few weeks ago, I was browsing through the sea of wedding blogs on my reader, when I came across a rather inspirational series of photos on Style Me Pretty.

This table arrangement made me swoon…but of particular interest were the pretty paper pinwheels! How cute are these???


All images from Style Me Pretty.

I quickly wiped the drool off of my face, and began to think. This…is…do-able! I love the combination of whimsy and elegance the pinwheels create! After figuring out the logistics of creating them (sooo easy…a tutorial is forthcoming…I promise!), I decided to try out a few samples. It took a few to get the hang of it…haha!

I used scrapbook paper (12”x12”), which I cut into 3” wide strips, and put in 1” accordion folds. 1” was CLEARLY too big…

After the first failed pinwheel, I decreased the accordion fold to ½” wide, and the result was much better! To finish the look, I added a button to the center…so cute!

After I made the larger pinwheel, I tried out a few smaller sizes as well, decreasing the pleats to ¼.” I thought they turned out well!

So…what am I going to do with these, you ask? First, the large pinwheels are going to be tied to the back of ½ of our reception chairs (every other one) in a similar fashion to what was pictured above. The medium sized pinwheels will become a part of the place settings. And, finally, the tiny ones will be used on our escort cards! According to my calculations, that means I have to make at least 300 pinwheels...gulp! I’m so excited about the final outcome…but am somewhat dreading the pain that my fingers are going to undergo during the folding process!

Next up, I’ll show you the pretty paper that I found, search for hundreds of buttons, and provide you a tutorial on how to make your own pinwheels!

Tuesday, November 24, 2009

Revisiting the venue

So, as you may have heard, I have a jam-packed week! And, thus far it has proved to be extremely productive…I couldn’t be happier!

On Saturday, there was a wedding at our venue. I was so excited that we were lucky enough to be home during a week with a wedding occurring! The manager told us that we could swing by during the early afternoon, before the guests started to arrive. I couldn’t wait to get there!

When we originally visited the venue, it was set up for normal day-to-day club activity. This time, it was in “wedding” mode. I was so glad to see the differences! Now, I’ll share some before-and-after pictures!

Remember the front entryway?

BEFORE:

Last time, it was filled with couches and a coffee table. For a wedding, they remove these and place a skirted table in the center of the room under the light fixture.

AFTER:


…and that…my friends…is where the wish tree guestbook is going to be placed!


Can’t you just imagine it? The tree will be the first thing that our guests will see as they walk through the venue’s door…

Also, behind and to the side are the skirted tables for the gifts, etc. I found some great items to decorate that space with…but I’m going to keep you in suspense until later…


There is a NEW addition to our venue since we last visited! Apparently, there was a wedding at Carlouel in October that used grapevines wrapped with white lights and votive lamps. The manager liked it so much, that he bought it from the florist, and it has remained up ever since! Unless a bride requests it to be taken down between now and the end of May, we are going to keep it in place! And, the manager was nice enough to tell us that they would put it back up for us if we wanted it and it had been taken down! Yay for free décor items!!! And, ooooh I’m drooling at the thought of how it will be lit up during the reception…so romantic!


Just to give you an idea of how it looks lit up!!! So...romantic...


Last time we were at Carlouel, the “birdcage” area (I’m not kidding, they call it that…how perfect?) was set up for regular lunch-time pool activity.

BEFORE:


This time, we got to view the bar/cocktail hour setup! They set up a really nice large bar out by the pool, remove the tables and place them outside the covered area (and cover the tables with linens), and add a few tall pub tables. I’m digging the setup for our cocktail hour (now if only the weather would be perfect….)!

AFTER:

So, I am SO BEYOND excited about our venue after out visit! It really solidified how incredibly awesome of a choice we made. Sigh of relief, anyone???

With subsequent trips, did you just continue to fall more and more in love with your venue???

Thursday, November 12, 2009

A Breath of Fresh Air...

Have you ever had a point in your wedding planning when you suddenly changed direction? I think I’m having that moment…let me explain…

To be fair, in regards to the florals involved in the wedding, I never really had the “perfect” idea. I see flowers…I think they are pretty…but nothing has essentially jumped out at me as being the flowers I MUST see on our tables or in bouquets.

Here was the original plan:

Hydrangeas, hydrangeas, hydrangeas.

I was drawn by the “poofy-ness” of them, if you will. Oh no, wait…the florist suggested these…I more or less agreed. Don’t get me wrong, I think they are beautiful…but…

I’ve been thinking a lot lately about my DIY’ing…my mother and I have decided that we are going to tackle the centerpieces ourselves. And I am a nit-pick. Hydrangeas are known to be delicate, and die quickly. I’m starting to worry about a wedding day hydrangea catastrophe. I can’t have partially brown flowers on our tables. I’d die.

Then comes the issue of price. Thankfully, with a DIY option, we can purchase flowers in bulk and save money by arranging them ourselves. However, flowers are still expensive…

***Screaming angrily in frustration***

But then…I stumbled upon some amazing inspiration, and I’m hooked. And it is by the most unexpected flower imaginable.

Baby’s breath.

Oh my gosh…that’s right. I said it! For years I have despised baby’s breath…the extra little filler that they shove in bouquets…who needs it?!?!


But seeing these photos changed my mind…

Style Me Pretty

This wedding in Aspen featured puffs of baby’s breath hanging from the ceiling! Gorgeous!


Style Me Pretty

Even bouquets look gorgeous, and simple! I’m thinking that my bridesmaids might have to be carrying these bad boys! Poofy and full and beautiful!


Following images from: Sedona Bride

This wedding was literally styled from top to bottom in baby’s breath! I’m in love…

I LOVE her bouquet...so romantic!


Following images from: Weddingbee


Mrs. Lemonade’s wedding also featured beautiful baby’s breath décor!

The little "bombs" are adorable!


So…what do I love about baby’s breath? It is cost-friendly (and I like to get a lot of bang for a buck), and I’m pretty sure that they will match my décor/theme well (birds, trees, whimsical, lighthearted…). Plus, I am hoping that it will be relatively easy and quick to set up as a centerpiece; score!

What do you think about using “filler flowers” as a part of your main décor?